dawsopenat7

Monday, 30 May 2016

Using a limiter on the mix buss, is it a good idea?

If there are any rules in mixing, one that is certainly worth going by is to not use a limiter on your mix buss.

I have used a limiter on my mix buss before and I'm going to explain why I don't do it anymore and how things got much easier once I stopped fighting it.

A limiter is simply a compressor with a very high or infinite ratio and is built to prevent peaks in an audio signal as well as limiting the dynamic range, allowing you to increase the overall dB level of the mix.

Because a limiter can shape the dynamics in a mix so much, this can cause problems if you are still in the mixing process and trying to make accurate decisions, especially with individual instrument compression. The main problem with trying to mix with a limiter on your buss is that it will warp your perception of the dynamics and characteristics.

Depending on the kind of audio material you are working with, your goal is likely to be to achieve a punchy mix and this is where your reliance on compression should be. Keep the limiter off your mix buss and no it won't be loud whilst you are working, but you can always turn up your studio monitors to compensate for this.

In the past i used a limiter on my mix buss, but i found i wasn't able to use compression properly and my judgement of transients wasn't entirely accurate because in some cases, they were already been reduced by the limiter and this seriously affected the way i compressed certain instruments. Since then, I have never used a limiter on my mix buss whilst mixing and my application of compression is the best it has ever been. 
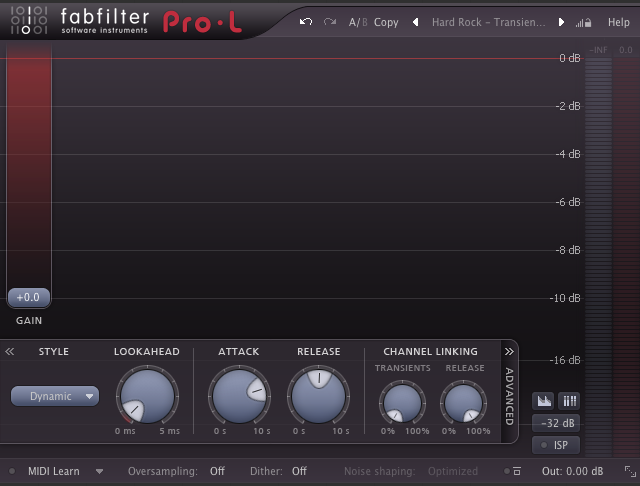
I only apply a limiter to a mix when I am sending a draft to a client, just so they are able to listen at a more standard volume level. When preparing audio to be sent to a mastering engineer, I always remove the limiter. This is an industry standard for shipping audio material to a mastering engineer as they expect to receive files with a good amount of headroom to work with. It is part of the role of a mastering engineer to apply limiting to a mix and this is where the 'loudness' of a commercial release is achieved.

For the many occasions where I am mastering my own mixes, as many home studio owners also do, I bounce out my entire mix without a limiter. I then master the track in a separate session, allowing me to focus entirely on the stereo audio file with no option to tweak with individual aspects of the mix. I like to think of this as printing or committing to a mix and the only thing I have left to do is add the final polish and make it a cohesive product. 

Try mixing without a limiter on your mix buss and focus on achieving a great mix using your two most powerful tools, EQ and compression. Leave the limiting to a separate mastering session or for shipping our to a mastering engineer. 


I offer online editing, mixing and mastering services, check out www.jwaudioproductions.co.uk and get in touch via the contact page about your project.

Saturday, 28 May 2016

Saturation in Mixing


For most home studio owners including myself, ‘in the box’ mixing is how we get things done and even though most of us don’t have access to large SSL or Neve consoles and analog tape machines, there’s absolutely no reason why outstanding mixes can’t be achieved entirely in the digital realm.
That being said, there are certain elements that are great to add to your mix to create richer harmonic content, much like the character that is added by mixing through analog equipment. The element is saturation. If you’re a guitar player, this is something you’ve more than likely experienced when playing through valve amplifiers when they are cranked up. In the recording world, saturation is most commonly known as the break up of a signal when being recorded to analog tape and the result is a light distortion and compression. Despite it technically being an issue when recording, the results are very pleasant to the ear and the technique has been used in the recording industry for decades. The warmth and body that saturation adds to the tone of an instrument is something hard to describe in technical terms, but it is a type of sound which is very appealing and sweet on the ear.
The first place i like to begin with adding harmonic content to an audio track is by inserting a console emulation plugin. There are many different brands out there, but i have been using Slate Digital Virtual Console Collection since it was released and i have it on every single channel as standard. I do this because i like to treat my audio as if it had been recorded through an analog console and with this plugin i have multiple choice over the type of console.

At this point, I’d like to mention that i don’t rely on console emulation to make my mixes sound good because it’s a very subtle effect that is most audible when applied across a group of tracks. To my ears, console emulation glues all my audio tracks together and gives them a greater warmth and colour which all contribute to making a more organic sounding mix.
As well as console emulation, i like to use saturation on certain instruments to add even more character to a sound.
Saturation can be used as a subtle effect to add a little bit of character and vibe, but it can also be used to inject energy and bite that was perhaps lacking before.
Saturation on a snare drum is a great place to start if you haven’t tried it before. Insert a saturation plugin in the chain (mine usually goes immediately after the console emulation plugin) and have a play around with the settings, you can’t do anything wrong with a saturation plugin, but keep in mind that the effect is much better when it is used sparingly. I use saturation on a snare drum with the intention of making the loudest transients less brash, creating a smoother sound for the compressor to work with.

If you’re goal is to enhance your audio track then be gentle with the amount of saturation you apply, a little goes a long way. However, if your goal is to shape your audio source into something different, then use saturation without limits and be creative. I really like to use saturation in combination with distortion on bass guitar – I use the saturation mainly on the low to low mids and the distortion on the mids to high mids. This gives me the warmth, punch and bite that allow the bass guitar to site perfectly with the drums and cut through the heavy distorted guitars.
Remember, if you’re wanting to retain the sound of the instrument that you have achieved without saturation but you want to add something more to enhance it – try adding the effect in parallel and blend in against the original track to taste.
It’s important to consider that the benefits of saturation and distortion are very subjective and you will find a lot of content on audio forums and YouTube videos discussing whether it’s important to use in digital mixing or not. There is no denying that it’s a very interesting topic particularly because digital mixing has made everything so convenient and accessible to everyone, and yet we all strive to achieve the ‘analog warmth’ that we hear in older records and it is something that we can’t truly describe.
I use saturation and distortion on certain instruments and sometimes on my mix buss because i was looking for that extra bit of something to add character to my work. Since i found it, i’ve always liked what i’ve heard and for that reason, i will continue to use it in my mixes.
Give saturation and distortion a try on some of your mixes and let me know what you think, you might be surprised!

Knowledge Wednesday


Weekly words of wisdom!

For maximum efficiency when mixing, make sure you label all of your tracks. Label your drums – kick in, kick out, snare top, snare bottom, hats etc. Label your guitars – rhythm left, rhythm right, lead centre etc.
As well as correctly labelling your tracks, be sure to put everything in an order that you can work with. For me, i start with my master fader on the far left, then all the drum tracks, bass tracks, guitar tracks, additional layers and all the vocal tracks following from left to right. You might want to have all your vocals on the far left or even in the centre and build from there – there’s no right or wrong way to do it, but the key is to maximise your workflow and ensure you aren’t loosing any time in your mix session. Take advantage of track colours as well as this can make your groups easily identifiable.


This is a very simple tip but it is certainly one to take note of because you will find that your workflow will be much more efficient and your focus will be entirely on the audio content without any distractions from poorly organised and unnamed audio tracks.
Go to www.jwaudioproductions.co.uk for any editing, mixing or mastering enquiries and get in touch via the contact page.

Toontrack drums

I’ve been playing guitar since the age of 7, but song production is something i only began to pursue when i was in college and Toontrack drums have been with me since that point.
I’ve been lucky enough to have the opportunity to record live acoustic drums on many occasions and this has given me a great knowledge and understanding of the importance of microphone placement, drum tuning and the standard of the drummer. Unfortunately, as a home studio owner i don’t always have the facility to record real drums and neither do some of the clients I work with, but there was no reason for this to hinder my creativity and stop me releasing high quality mixes.
Enter Toontrack drums. I started off with EZ Drummer (Pop/Rock) with multiple choices on snare, kick, toms, hi hat, two crash cymbals and a ride cymbal. It was great to have such high quality sounding samples and be able to program them into a piano-roll or play them from a midi controller. This improved my productivity and also gave me a massive confidence boost when writing and producing songs because i knew i didn’t have to worry about the sound of the drums.
It wasn’t long before i upgraded to Superior Drummer 2.0 and from that point on, i have never looked back.
It was quite overwhelming at first because the amount of choice on the drums and cymbals is incredible and that’s before even looking at the configuration options in the built-in mixer. I’d like to mention that i have used this software from different angles – choosing drums, tweaking sounds and adding layers and sticking with a preset and simply programming drum patterns for a song. Spending time sculpting the drum sound was time well spent because I got to know the software, how to add layers (X-Drums), how to use the tune dial, how to adjust the ADSR, how to adjust the bleed on individual tracks and how to use the velocities to trigger different samples at different numeric values. Equally, time spent programming drum patterns to create a song was time well spent because I developed my ability to compose and nothing has improved this more than simply writing songs.
I spent a couple of weeks experimenting with Superior Drummer 2.0 before i started work on another song because i wanted to learn the software and create my own preset so that i could produce my own songs with ‘mix ready’ drums. Once i had this, my productivity increased to a level that i did not expect because i was able to focus on composing without leaving my studio and i was able to listen to a mix by the end of a session. Aside from programmed drums being a great convenience, it always gave me a sound that i could be proud of because i knew i could put out a mix without people questioning the quality of the drumming or the sound.
I’m not an official endorser of Toontrack but, i can’t speak highly enough of them because their products have given me a palette of endless high quality drums to chose from, all on a platform that encourages productivity and creativity, not to mention the inspiration it gives me when i’m starting something new.
If you haven’t used Toontrack software before or you are currently making up your mind, I strongly suggest you invest in either EZ Drummer 2 or Superior Drummer 2.0. If you are a home studio owner and a composer, Toontrack products are simply the best value in terms of the amount of drums you get for your money. As well as this, take into consideration the experience of the engineers that recorded all the samples using the highest quality microphones, preamps and mixing consoles all in some of the greatest sounding live rooms in the recording studio world. I can’t personally put a price on any of that.
Even if you aren’t interested in all of the drums sounds that are available, it could still be an invaluable tool in your home studio because it gives you a drum kit ready to go immediately in your DAW. It’s simply one less thing to worry about and you can just focus on doing what you love, creating music.
Overall, Toontrack have been one of the greatest benefits to me as a home studio owner and artist because they have given me quality drum sounds with a user friendly interface and endless configurability options enabling me to make music in the height of creativity. They also enable me to offer the same standards to clients that are also limited with their drum writing or recording facilities.
If you haven’t already done so, check them out at www.toontrack.com/drums
If you’re interested in editing, mixing or mastering services, head over to www.jwaudioproductions.co.uk and get in touch via the contact page.

Remember: Mix at low volume levels

The importance of balance has been discussed in an earlier post and in this one I want to talk about completing this process whilst working at low volumes.
We all like to hear everything loud, especially the drums and bass, they have fundamental frequencies we want to feel as much as we can hear but in the context of mixing this isn’t the best way to operate as it can prevent you from accurately balancing, EQ’ing and compressing. Listening to a mix too loud is at the very least a distraction and also potentially damaging to your hearing if listening for long periods of time.
It’s important to balance at low volume levels because you are able to accurately balance your track levels and you’ll also find that you have a better sense of depth and width which is particularly useful for panning and adding reverbs.
Think of it like this…If your mix sounds good at low levels it’s a lot more likely to sound good if not better when it’s turned up. It’s important to realise how easily your ears can be tricked especially when listening at high volume levels and this can be very problematic when using compression. A snare drum or a lead vocal may sound just right when the mix is cranked, so you might not use compression to its full advantage however, you might notice when you turn your mix down, these instruments start to get lost in the mix and aren’t as ‘in your face’ as you first thought. If you focus on achieving ‘punch’ with compression whilst operating at low volumes, you will definitely get a more satisfying result that will translate very well when turned up.
It is also good practice to EQ at low volume levels, but always check your adjustments at higher levels especially with low frequencies as they are much harder to judge when they are quieter.
It’s not wrong to mix at high volume levels but you’ll find that you balance, compress and EQ your tracks more accurately and you will begin to appreciate the quality of your mix if you utilise working at low volume levels. Of course, go between low and high level volumes to check your mix and even just listen to it cranked at the end of a session and just sit back and enjoy your hard work. Take care of your ears for maximum productivity and value being able to mix at low and high volume levels.
If you would like to discuss your project, use the contact page on www.jwaudioproductions.co.uk 

Knowledge Wednesday

Weekly words of wisdom!


Remember to listen to your mix as a whole as well as soloing instruments.
When EQ’ing, it’s always good to play with high and low pass filters whilst listening to the entire mix so that you can hear the impact and more importantly, the benefit it is having to other instruments. Try applying a high pass filter EQ to your drum overheads whilst listening to the entire mix or just the drums as a group and listen to how much clearer the low end becomes as you cut out the unwanted frequencies. Try this with the drum room tracks as well.
It’s important to go between full mix and solo’d tracks particularly when learning about mixing as it’s quite easy to become disheartened with the sound of an instrument on it’s own as the EQ cuts you make don’t always sound that great in isolation, but remember the bigger picture – all the individual elements and decisions you make are contributing to a song.

How to achieve a big rhythm guitar sound


If you’re a guitarist like me then you take a lot of time and care to achieve the guitar tone you want. You’ll find that it sounds great in the room through your speaker cabinet and through your studio monitors, but when you’ve recorded a take and you play it back with yours drums and bass, it suddenly falls flat, it’s not a big as it sounded in your environment and it’s now fighting with other instruments.
The great news is that there is a simple solution to this problem and you can achieve it without using a single plugin. It is important to note that the solution starts at the recording process. Take the part that you have just recorded, mute it, create a new audio track and record the same part again. Once this is done, un-mute the other track, pan one hard left and the other hard right and listen to the results. I guarantee you’ll be pleased with the results! I remember the first time I implemented this technique and I was blown away so much so that i now make this my standard process for recording all rhythm guitars.
It’s important to keep your playing super tight when tracking and be sure to record with a click track. Don’t worry too much about slight differences between the two rhythm guitars as it will simply add to what is already a wider stereo image.
Please remember that copying and pasting takes and panning them left and right will not work and will only cause phase issues. To hear this for yourself, try copying a take and pan each of them to the left and right and you’ll hear them both in the middle and a bit louder (not stereo as they would be with multiple recorded takes). I won’t go into the properties of phase but the only way to achieve this effect is by tracking your rhythm guitars twice. The results are totally worth it!.
So if you’re looking for a simple way to get your rhythm guitars to sound bigger, try tracking them twice and pan them out wide. I promise this will do a lot more for your mix than a plugin ever will. It doesn’t have to stop with double tracking either, you can quadruple track your guitars and in my experience this is best done with the final pair of guitars being recorded with a slightly different tone. For example, I like to track two guitars with humbuckers and the other two with single coil pickups as I find these to add a little extra bite, particularly with distorted guitars. If you aren’t already double or quad tracking your guitars, try it out, you’ll never look back!

Know when to take a break


Whether you are new to mixing, an amateur, semi-pro or fully professional mixing engineer it is always important to take time away from a mix because it’s very easy to get in too deep with adding plugins, tweaking EQs and cycling reverb presets etc and before you know it, your productivity slows right down and your decisiveness suffers. As harsh a reality as that is, there is a way to fix it.
During a mix, take 5-10 minutes away from the session every hour. It’s really important to give your ears a rest as they can fatigue very easily and in the mixing world, there’s nothing more important than your ears. After mixing for a long period of time you will inevitably become biassed towards your own mix because you have simply gotten used to what you’re hearing and it can become very difficult to make objective decisions in terms of EQ and compression.  It’s good to give your mind a rest, it’s a time to regroup, gain some perspective and refresh before going back to work. Try to implement this as a standard whether you feel like you can keep going or you’ve hit a ‘wall’ and value the time away from the session as much as the work itself.
As well as breaking away during the mix, it’s also very helpful to take a day or two when you’ve completed a mix. This is particularly useful to do before you sign off the work as you will be completely fresh to the session and be able to make a clear cut decision on whether to approve the mix or not. I’m not suggesting that when you revisit your work after a break that you’ll find problems, in actual fact the time away may just give you the answer that you’re looking for and you can give your seal of approval there and then. For me, when I come back to mixes It’s often that I’m not 100% happy with the level of a vocal and I might add some automation, then I’m happy. Sometimes it’s simply the level of a wet reverb signal and I may have been overly generous or not made the effect prominent enough.
Never get yourself to a point within a mix where it becomes a stressful task, as soon as you start to feel this happening – walk away immediately, it’s time to take a break. Coming back to a mix with fresh ears is the best thing you can do as you’ll be able to EQ and hear compression more accurately and most importantly make decisions quicker. Remember to value the time away from a mix as much as the time spent on one because more often than not, it’ll be exactly what you need to move forward and finish the mix.

Knowledge Wednesday

Weekly words of Wisdom!
High Pass Filter – This tool allows you to attenuate/remove frequency content below the chosen frequency cut off, therefore allowing the higher frequencies to pass through. Try this with a parametric EQ plugin on your rhythm guitars to remove the unwanted low frequency content. Start by rolling off up to 80Hz to create space for the kick drum and bass guitar which will immediately have more clarity with this mix move and even increase as far as 120Hz if needed. This is a great trick to allow the bass guitar to sit nicely underneath the rhythm guitars. Below is generally what a high pass filter will look like.


Low Pass Filter – This tool allows you to attenuate/remove frequency content above the chosen frequency cut off, therefore allowing the lower frequencies to pass through. Try this with a parametric EQ plugin on your backing vocals to remove some of the unwanted high frequency content. Start by rolling off at 6-7KHz to put the backing vocals a little bit further back in the mix and allow the main vocal to be the dominant one. This is a great trick to easily create depth and space in a mix without using reverb. Below is generally what a low pass filter will look like.


Remember: Create space in the low end

Whether you are mixing 10 or 100 audio tracks you will certainly have multiple instruments fighting for their own space and also claiming unnecessary space. For the purpose of this post, i’m going to talk directly about the essential low frequency space.
Generally speaking, all frequencies can be problematic at some point but none more than the low end frequencies. The majority of your audio tracks will have low end content and in the context of a mix with multiple instruments, there simply isn’t room for all of it and you need to prioritise the sounds that you want to occupy that space. To keep things simple, i’ll say the bass guitar and kick drum are most likely going to be chosen to occupy the low end. This means the snare, hi hats, overheads, room mics, rhythm guitars, lead guitars and any other audio tracks need to make way for the kick drum and bass guitar and let them be heard and felt in the way they were intended to be.
The quickest and easiest way to deal with this is by grabbing an EQ, setting a high-pass filter and sweeping all the way up to 100-120Hz. You may not need to be quite this aggressive with all your audio tracks, but for the instruments i’ve mentioned above, you aren’t filtering out any of their important fundamental frequencies, you are allowing the fundamentals of the kick drum and bass guitar to occupy their own space without interference from any other sources.


If you’re a guitar player like me, when you first start mixing you will focus on this instrument first and it is very tempting to keep the low end of your rhythm guitars in a mix because lets face it, we all love the sound and feel that we get from a 4×12 cabinet on stage, but the reality is that in the context of a mix, the low end simply isn’t needed from guitars and they work much better by allowing other instruments their own space. You can look at it as a compromise or sacrifice but i can promise you that it’s a positive move to cut. Try your next mix with two versions, one version with cuts made to the low end to make space for the bass and kick and another version without and see which you like best. I’m very confident you’ll prefer the first version.
One important thing to take into consideration is that when you solo the instruments , they may not sound as good with the low end cut, but listen to the mix as a whole and appreciate the context because your goal should be to get all the sounds working together in balance.
The topic of low frequencies is much larger than the size of this post but i wanted to highlight the importance of creating space in the low end for two of the most common sources, the kick drum and bass guitar.

Importance of Perspective

When mixing on studio monitors whether it’s an affordable set of M-Audio’s or more expensive Genelec’s, it’s important to consider the formats that the audience will most likely be listening on. For example, laptops, phones, mp3 players, car stereos and home HI-FIs. I’m going to say that you’ll have at least two of the above and if they weren’t before, they are now another set of tools that have been added to your arsenal at no extra cost.
Checking your work on different formats isn’t something you’ll always need to rely on as you become more confident in your ability however, it is an invaluable tool to learn about how your mixes translate to real world systems. It is particularly useful for people who are mixing in acoustically un-treated or poorly treated spaces as it will expose areas of your mix that you may not have recognised before for example, overly generous low end frequency boosts and excessive amounts of reverb. As you complete more mixes and check them in this way, you will become more aware of any issues displaying themselves in your mixes and be able to address them at source.
One of my biggest problems that i identified was that my distorted rhythm guitars were too bright in quite a lot of my early mixes and although they sounded good on my studio monitors, they weren’t translating well enough on other formats. I’ve never had the problem again because i now roll off the high frequencies on rhythm guitars in an area that makes them sound good across all formats.

Although this is a very simple technique, it is a very useful tool for learning and developing your skills as it will provide you with evidence on how your mixes translate across different formats. Of course we all hope our mixes will be played on similar setups to our own or expensive HI-FI separate systems, but it is just as important that your mix is clear and sounds good on a pair of £20 headphones because then you truly know you have achieved a good, balanced mix.

Why you should keep mixing simple

In the mixing world today it’s easy to believe that it’s a complicated process full of secrets and successes that can only be achieved with expensive hardware and software but the fact is – this is totally NOT the case. Don’t get me wrong, i’ve spent a long time having the same belief and thinking “It’s not possible for me to achieve a mix to the standard of Chris Lord Alge, Forrester Savell or Randy Staub without the equipment that they have”, but the reality is that these guys set the standard that they have because they have the experience and have spent a long time honing their craft particularly with the core elements of mixing, balance, EQ and compression.
If you are someone feeling like that right now then this post is for you.
It’s time to take things back to basics, no endless track counts, no complicated channel strips full of plugins that you don’t really need and no infinite amounts of drafts and revisions before you may or may not decide to bounce the track out of your DAW.
Start your next mix with the conscious decision to use 1 compressor and 1 EQ for every track you work on. You ask why? I’m telling you this because i’ve implemented these limitations on myself and i can tell you first hand that it works because you are forced to achieve a result with what you have. By doing this you also remove all the questions going through your head about what plugin you should use, what everybody else is using and what brand has promised you results. It will free up so much of that needed space in your mind enabling you to focus entirely on the one plugin you have available and know that you have to achieve the sound you want with it. I’m not necessarily suggesting that you stick to DAW bundled plugins, but make a decision on a single plugin and stick to it.

As i mentioned in an earlier post, balance is one of the most important things in mixing and this is entirely relevant to the idea of keeping things simple. Start every mix by playing with the faders and pan pots, get the mix to where it sounds best to you and then apply the rest of the core elements, your chosen EQ and compression. If you treat your mix as these 3 core elements then the mixing process will immediately feel easier and more manageable because you are breaking it down into stages which have clear objectives.
As well as setting these positive limitations, this will allow you to become more familiar with the plugins and really understand how they respond to the audio you are working with. Choose the built in EQ and Compressor in Pro Tools, Logic, Reaper, Cubase or go with a plugin you own such as Fab Filter, Waves or DMG Audio. Make this decision and i guarantee that you will achieve results in your mixes faster than ever before and more importantly, you will gain a better understanding of EQ and Compression without the distraction of the hundreds of plugins out there that sometimes we want just because they look good.
Keep things simple in the beginning with mixing because you will truly learn the value of limitations, the principals of EQ and compression and the importance of balance. These are all factors that you will be able to apply to whatever DAW you are using and therefore, make you more versatile as an engineer if you are ever faced with having to achieve a result within a DAW that you aren’t familiar with.

EQ – A golden rule or just good practice?

When mixing, one of core tools we use to shape a sound is EQ.
We all use different plugins for this, some built into our DAW, some online freebies and others purchased from plugin developers such as Fab Filter.
For the purpose of this post, we will be focussing on parametric EQ. Typically having multiple frequency bands, we have control over the frequency, gain and bandwidth (commonly known as Q).
Frequency – Adjusting this control will determine which frequency will be affected by the choices made on the following two controls.
Gain – Adjusting this control will add or subtract gain to the chosen frequency. Remember that without using this control, no other parameters will have an affect.
Bandwidth (Q)– Adjusting this control will determine how wide or narrow the boost or cut to the frequency band is.
If you haven’t used this type of EQ before, the best thing to do is bring up the plugin on an audio track and have a play around. Create a 10dB boost at 100Hz with a narrow bandwidth (see the example below) then sweep up the frequency bands and listen to how the sound of the audio source changes.


Now, to bring this post back to the context of the title. I want to talk about the idea of cutting frequencies with a narrow bandwidth and boosting with a wide bandwidth. I’ll answer the question immediately, I believe narrowly cutting and widely boosting frequencies is just good practice, not a golden rule and I’ll explain why now…
It’s important to look at EQ within the context of what you’re mixing. Are you mixing a snare drum that has an annoying ringing tone? Are you mixing a kick drum that’s lacking some low end thump? Or are you mixing a vocal that needs a little more air adding?
I’ll firstly use the snare as an example. If I have an annoying ringing tone between 500Hz and 700Hz then I usually create a narrow band and boost by about 12-15dB to really accentuate the problem frequency. I sweep around these areas until I hear the ringing most acutely and quite often it will start clipping on the channel I’m working on. Once I’ve found this frequency I will normally cut it by as much as 6-12dB and sometimes more (it’s not about the numbers here, it’s about what your ears are telling you) and I will then bypass the plugin a few times both with the snare solo’d and also within the context of the full mix. The reason for cutting using narrow bandwidths is to ensure the fundamentals and character of the sound are left intact. The important thing to realise here is whether it sounds better with or without the cut, remember to trust your own ears and don’t just cut a frequency because other people say so.
I’ll use the vocal as another example. If I have a vocal that is quite dull and lacking some air, I usually create a 3-4dB boost between 8-12KHz with a wide bandwidth. I then check this solo’d and within the mix and add or reduce gain to taste. The reason for boosting with wide bandwidths is to ensure that the increase in gain is audibly smooth across the frequency band and therefore more pleasing to the ear. In the context of a vocal, imagine boosting a frequency with a narrow bandwidth in an area which happens to be around vocal sibilance and the result would be a dull vocal with accentuated S’s on certain words.
An example of when you might work against the practice of boosting with wide bandwidth is when you’re working with an ambient synth pad and you may want to highlight certain resonances to create a droning sound. Using a narrow bandwidth allows you to zone in on the fundamentals of a sound and choose exactly where you want to boost. You may want to highlight 440Hz which is the musical note of A.
Another example is when mixing a snare drum. One particular area i like to boost is between 170Hz and 200Hz (depending on the drum) to highlight the fundamental which adds a lot of weight to the snare. I prefer to boost using a narrow bandwidth in this frequency band as this is the only part that i want to be accentuated. I will usually boost between 4-6dB. I will often do a mirrored EQ on the bass guitar around the frequency that i have boosted and cut in the same area to allow both instruments to work together without competing for the same area in the spectrum.


The main purpose of this post was to give an insight into why boosting wide and cutting narrow with EQ is just a good practice, not a golden rule. There are always exceptions to a rule and i apply them or go against them on pretty much every mix i do. Remember to trust your ears when mixing and don’t judge a sound based on the visual aspect of an EQ plugin. The important thing to do when making EQ decisions is to ask yourself what you want to achieve and why.

Knowledge Wednesday

Wednesday weekly words of wisdom!
Parallel compression – Create a copy of your audio source in your DAW and add heavy compression (fast attack, slightly slower release, high ratio and pull down the threshold until you hear the compressor working, make sure the level is the same with the compressor bypassed) and blend in with the uncompressed track – try this on your drum buss for extra punch!
Parallel distortion – Create a copy of your audio source in your DAW and add distortion or saturation to this track and blend with the clean track – try this on your bass guitar track for extra bite and to help it cut through the mix and sit well with distorted guitars!
Mirrored EQ – Cutting a certain frequency band on one instrument and boosting on the same band on another – try a gentle cut around 65Hz on the bass guitar with a narrow/mid bandwidth and then boost with the same settings on the kick drum, this creates space that allows each instrument to sit nicely in the frequency spectrum in harmony. This technique can be applied both ways if you want your bass guitar to occupy more of the low end.
EQ in the mix as well as soloing – Use this technique when EQ’ing your drum overheads and room microphones to ensure you’re not removing too much of the frequencies that help them cut through! Switch between solo and full mix to hear them in context.
Automation – Automate your master fader to make your song more dynamic – A 1dB boost on a chorus can make a massive difference and grab the listener on that all important hook!

All About Balance

When starting out on a mix the first thing we always want to do is start adding plugins and tweaking settings to achieve that killer sound we have in our heads without any clear direction and structure to our decisions. Speaking from experience, I used to work like this, sometimes achieving great results and others that were worthy of the trash.
We all want to get the best results from our work and we also want it in the shortest amount of time possible – this is where the importance of our mix decisions come in. The most simple and effective way to begin a mix is by listening to all the tracks raw with no plugins and actively listening to what is happening for example – is the snare too far back? Do the guitars need panning hard left and hard right? Does the vocal need to be more upfront? Is the kick drum too loud? The best way to address these questions is by simply moving the faders. Start by pulling everything down to zero and focus for a moment on the foundation of most mixes – the drums. Pan the stereo overheads and room tracks hard left and hard right, this will create space in the centre for the mono sources such as the kick and snare. It’s important to mention there is no right or wrong with panning drums, there are many records out there which vary between the drummer’s perspective (sat behind the kit) and the audience perspective (stood in front of the kit). It’s all down to personal preference, I have used both perspectives but right now I’m working with the drummers perspective.
Next, bring the faders up for the bass and guitars. If you have double tracked guitars, pan them completely out to the left and right to create space in the centre and it will also give an immediate widening effect of the entire mix.
Now bring up any other audio tracks such as piano, synths and any extra audio tracks. Finally, bring up the all important vocal and try to find a sweet spot where it sits just nicely on top of the mix. Remember, we’re not looking for perfection here, we’re just trying to balance all the audio tracks out naturally using only our ears for the guide.
Remember to keep this process simple and trust your instincts. Work with the faders and pan pots as if they were the only tools available. Sometimes limiting ourselves forces us to achieve the best result with what we have and mixing using only the faders and pan pots is certainly a positive example of this. The art of mixing in its simplest form is the balance and space between all the instruments, the tools we choose to use later are there to bring out the best parts of sound sources and make everything more audibly pleasing to the listener.